Friday, July 9, 2010

Part X - Replacement Logs

October, 2009 - March, 2010

In late 2009, I finally found a source for new replacement logs. After determining that I needed approximately 10 new logs, I first set out looking for logs close to home.

The obvious source would be the Medina River, which lay about a mile from the site of the original cabin and was obviously the source for the original cypress logs, since cypress only grows around rivers.

In 2006, I had kayaked down the Medina River and seen plenty of cypress trees:


The problem is that Texas now prohibits harvesting of new cypress from rivers. The only ones you can get are those which have died or been pushed over in floods. I had seen some such trees in my kayak trip, but they were hardly predictable, and while the river is open to the public, the trees are property of landowners.

Any trees I would have find would have required me to 1. identify the landowner (which would require GPS mapping and research at the courthouse), 2. seek permission 3. get to the location with a vehicle suitable to get the log 4. harvest the rather large and heavy logs, which may mean pulling them from the river, moving them across the river (using some kind of block and tackle) and then transport them home.

In 2009, I went back to the river on land owned by a friend of my mom’s and the best I could find there was one potential log – and it was on an island in the middle of the river.

This, therefore, was not going to happen.

So, I began searching on the Internet and discovered that the only possible sources for cypress wood would have to come from the East, with the closest being Louisiana. Fortunately, I stumbled upon a company right down the road from my house in Austin, Jimmy's Cypress, which I thought might fit the bill. Having a place not too far away was a big deal, because my replacement logs would be the biggest cost of the project - more than the original house itself cost. The best I could do would be a couple hundred dollars per log - plus shipping. If I was going to put down a couple thousand dollars on logs that I could not possibly see firsthand before they shipped, I wanted to have real human beings with whom to talk the project over.

Working with Emili Krantz, the wife of business owner Jimmy Krantz, I was able to feel comfortable that the product I was going to get would fit my needs. The logs would be slightly smaller in diameter than my original ones, but larger logs like mine are frankly really hard to come by. But the difference was not too great, and if I adjusted the notches on my new logs, they would easily work.

So I put in an order and had to wait. I needed 10 logs, 16' long. It would take them a while to separate out some that worked to my specifications. No problem, I thought. I won't be able to build until the summer anyway.

Finally, in March, my logs arrived, delivered on a flatbed truck.


My logs after arriving. Although I ordered 10, I got one extra. I'm not complaining. I figured I'd probably need everything I could get.
So we got out the John Deere tractor and prepared to unload them. (Note the bumper sticker)

After carefully snapping the bands holding the logs together (careful in case they decided to roll on their own), I got out of the way and took pictures as brother Ray prepares to unload them with the aid of the tractor.


Ray unloading the logs:

Finally, the logs are here. Now it's time to put up and shut up. Either I build the cabin or resign myself to having wasted a whole heck of a lot of time and energy:


Thursday, June 24, 2010

Note:

I started this project in October, 2008. The posts are being post-dated backwards so that it shows up as a running chronology, rather than with the most recent post first.

Part IX - Evaluating the logs/Taking a break

December, 2009

It’s one thing to disassemble a log cabin. Piece of cake. Putting it back together, like Humpty Dumpty, is another story entirely. Especially when you’re an amateur and have never done anything like this before.

One thing I learned is that it’s good in any endeavor to have at least 1 optimist and 1 pessimist involved. In Iraq, I served in a position which allowed me to sit in on videoconferences with many of the top generals. Gen. David Petraeus was an eternal optimist. His subordinate, Gen. Ray Odierno, was always a pessimist. They each learned from each other, and each fed off each other. It kept them both grounded in reality.

Having my brother Ray to bring my optimism short was useful in this project. Eventually, I began to realize how naïve were some of my own views, and started adding a discussion with my imaginary pessimistic friend in any planning session I held on the cabin.

When I originally looked at the cabin, I saw only the rosy side. The logs on the North and East side, which were heavily weathered, looked terrible on the outside, but fine on the inside. My thought was that since I was going to build an internal wall, I could just flip the logs and cover up the bad part of them.

Some of the logs were hollow inside (cypress rots from the inside out, unlike most wood). I thought I could somehow “fix” such logs.

Yet the more I began to look critically at the situation, I brought myself to reality. This would not be as easy as I thought. Some of the logs, I would learn, weren’t just ugly, they were downright dangerous.

Once the logs were relocated to the site of the new cabin, it was time to evaluate them. I could roll each log over, kick it, drill test holes or whatever to determine just how sturdy they were.

My initial look at the logs on the actual building gave me hope that I would only have to replace 2 or 3. This was good, because Texas cypress is now protected (as it was not in the 1840s when the cabin was built), and getting replacements would be very difficult. The only logs you can harvest, in fact, are logs which have already fallen down or from trees which have died. I’d seen a few such logs along the Medina River (the original source of the logs for the cabin back in the day), but few were big enough to meet my standards (15 feet long, 8-10 inches in diameter).

As I began to review my logs now, however, I realized I was not in as good of shape as I thought I was in. I didn’t need 2 or 3 new logs. I needed 7-10.

This created a huge problem, and meant I would have to spend a lot of time searching for replacements.

At the time this was happening, I was working in one particular job which suddenly went away (my boss was essentially removed from his position, and I wasn’t inclined to stay without him). So I went back to work for myself. Working for myself, I made decent money, but didn’t have a whole lot of stability. So it was a time to watch my finances and not get too extravagant.

Thus, between March, 2009 and December, 2009, I did not do any work on the cabin. All the boards from the frame part of the house were safely stored in the barn, and while the logs were in the yard at the cabin site, I would roll them frequently to keep them from weathering unevenly.

I focused on all the problems involved in running your own business for those few months, but in my spare time did some research on places to get cypress logs. After I found a few promising leads, I decided to go back to my site, canvass my logs and then take my order shopping for quotes.

So here are pictures of some of my several log assessment sessions:

To evaluate each log, I took a picture of it, along with a marker of its name. The naming convention is as such: The building has two main parts, the log cabin section and the frame add-on. The former is section I and the latter is section II. All logs are I something. Log IR6 is the log six from the bottom on the right side of the building as you face it from the front. Left is L, B is back and F is front. Not too complicated.


The log above is IR6.

In my project notebook, I noted the placement of each log within my pile, and I graded them A-F. Originally, I was only going to replace the Fs, but in the end, I would choose to replace all the Ds and some of the Cs.


This is the above-mentioned IL6, one of the worst logs on the cabin, which got an "F" rating. You can see that virtually the entire middle part of the log is gone. Only the side of the log facing inward (as it sat on the cabin) is there. The rest has been gouged out by rain and time.

The log third from the bottom in the above pic has severe rot. The inner section is actually very sponge-like. This one went on my "replace" list.

The log seen above is hollow inside. Also on the replace list. Not all of these are total losses. At the doors and windows, the cabin had "short" logs, of five or six feet long. Some of these can be replaced by salvaging the good half of an otherwise bad long log. Or the cypress wood can be cut up into pieces for other parts of the house. A door handle, a trim section around the window. Whatever.

My assistant log examiners are not very helpful.

Up to now, I've been showing bad logs. Most logs were good. Here are some excellent specimens. Of the approximately 30 full-sized logs on the cabin, I decided to replace one-third.


IB2 in the notes.

IB2 on the ground.

This guy had a hollow space, but I wanted to see how far in it went, in case I can reuse part of it. The photo shows it's pretty bad.


Some of my logs got confused. I did not want to use permanent markings on the logs, so I wrote in pencil. This didn't hold up after the logs got rained on, but I was able to re-identify most logs by comparing the logs on the ground to my many photos.

Friday, January 15, 2010

Prologue: The Pre-History of The Cabin

October, 2008

Howdy folks!

This is a blog about a cabin, a fool (me) and an experiment in historic preservation.

I'm an 8th Generation Texan, raised-on-a-farm type of guy who has been forced - by economics only, I swear - to move to the big, ugly city. Nonetheless, I like everything rural and try to get out to the old farmstead as often as I can.
I'm a pretty big history buff and grew up in the history-rich landscape of Medina County, Texas, just west of San Antonio. The area was settled in 1844 by hardy folk from the Alsace-Lorraine area of what is now France, but which historically has been a mixture of French and German influences. The colony was founded in the late years of the Republic of Texas by Henri Castro, and its principle settlement was named after him: Castroville.

A number of other settlements were founded throughout the area, and some farmers often built stone homesteads in rural areas of the county.

In college, I travelled through Europe and saw cool, old stuff everywhere. Castles, old houses, stores and shops. Everywhere you looked, history looked back at you. I lamented the fact that we live in a disposable society here in America, and we have precious little history of our own.

It was only a few years later that I began to appreciate that we do have history here in America. History everywhere around us. As I began driving the back roads of my home county, I realized that such history was just right below our noses. Driving around past isolated old farmsteads now abandoned, I was at once excited by how much was still there but at the same time aghast at the condition of the old relics.

"That's a nice old house," I used to tell my dad as we'd pass one of the old stone Alsatian settler homes where farmers had raised families and defended themselves against raids by Comanches and Apaches. "That's a nice old house," I'd say, "I wish somebody would fix it up."

Of course, living at the time off of the salary of a journalist, I never imagined that I could be one of those somebodies. But the bug of historic preservation began to grow inside me into a contagion of passion for preserving history. Gradually, as time went by, I noticed several of the old houses that I thought should be preserved were torn down. One house in the nearby town of Quihi, which had stood since the 1850s at least, was torn down to form a rock wall outside a modern, manufactured home. Another fell down on its own accord.

I was appalled. The City of Castroville had long since recognized the importance of historic preservation, and had preserved literally hundreds of these old homes, but outside of the city, most were ignored. Those owners who did want to preserve them generally didn't have the money or the time.


I had decided that one day when I had a little bit of money, I'd do what I can to save one of these old houses. I had several in mind.

One house (to the left) I had seen in passing for years, along the side of F.M. 471 between Castroville and Rio Medina. In size and design, it was typical of the old Alsatian stone houses.

Alas, its location virtually guaranteed it could never be restored and used for any normal purpose. It sits literally fifteen feet from the side of the road. As a business or for storage, it could still be saved, but the location is too dangerous to ever contemplate as a living space.

Nonetheless, a few years ago, a new landowner began to start clearing the extensive brush which had overrun the property. Cutting down whole groves of hackberry trees, he uncovered for all the world to see a true gem - something I never even realized had existed. It wasn't just any other old house - but a log cabin dating to the very earliest days of settlement.


You see, early settlers generally didn't have a lot of time to design and construct houses. When they first arrived in their new home, the land was usually wilderness. The premium was on clearing the land and planting a crop.

Generally, then, the settlers built crude log cabins upon their first arrival, which they used for the first few, tough, hardscrabble years. Only as they began to eke out a living and become permanent dwellers did they have time to build permanent, stone houses.

In most cases, the old cabins they had build upon arrival were retained as outbuildings - barns, chicken coops or storage. Often, they were torn down and the wood recycled. Eventually, almost all vanished in the end.

But here, right before my eyes, was one of those original cabins. The stone house which had originally caught my eye was a mere successor - the permanent house they had built after a couple of years. And down the road about 200 yards was another, larger stone house. Eventually I confirmed my suspicions and found that the cabin had been replaced with the small stone house, which in turn had been replaced.

The dating of the houses will have to wait for later research to be confirmed, but the area was settled in the mid 1840s, and it is almost certain that the log cabin dates from that point. At some later juncture, an extension - made of boards - was added to the house. My forensic research - which I will discuss later - makes me think that this dates at least to the 1800s.

In September, 2007, I had just returned from Iraq (see my blog about that: http://www.blogger.com/www.aalan94.blogspot.com ) and had a small amount of money available which I had put aside as a historic house rennovation fund. My hope was to find an old house on a small bit of land, and buy that to restore as a get-away place and a writer's cabin. I had my eyes on a couple of old houses, but one day I was driving past the old log cabin when I saw the landowner out cleaning up the property.

I stopped and chatted. He was a nice enough fellow. He said he wanted to try to fix up the old stone house one day, but nodded towards the old log cabin. "I'll probably tear that one down," he said. "It can't be fixed, and I'm thinking about putting a house there."

Right there, on the spot I told him I'd buy the house to save it. There was only one catch: he wasn't parting with the land, so the house would have to be moved. We negotiated for about 30 seconds, and for $1,500, I became the owner of a piece of history.

Of course, there was never a possibility of moving a stone house. They weigh too much, they would break apart and disassembly would be impossible - you'd have to mark and categorize thousands of small stones, not to mention clean them of plaster and replace them how they had been aligned before.

But a wooden cabin was a possibility.

I took a closer look at the house. (This is after the landowner finished cutting down the trees that were practically growing through it.)

The most obvious part of the house is that it is a dog-run. This was a style common to old frontier houses throughout Texas and the South. Two separate buildings were joined by a breezeway, which kept the place cool in the winter. But in this particular case, the dog-run was an after-thought, since the log cabin was obviously built at one time and a board section of the house likely built later.

The house sits only about a mile from the Medina River - this was certainly the source of the cedar logs used in construction. All the other trees in the area - oak, mesquite and hackberry - are crooked and inadequate trees for a log cabin. The logs were likely carted to the location either by wagon or simply dragged by oxen.

The use of boards is a giveaway that the second section is much newer. Boards could be cut from trees locally or bought from lumber yards, but either way required a much more settled, organized society than the frontier would have been in the 1840s. (More on the history later).

The second thing that I noticed in my inspection of the house was its pronounced lean in the back:


This, along with the fact that the two halves of the building were not joined by anything besides the roof, argued against moving the house in one piece, and I soon came to the conclusion that the only possible thing to do was disassemble it.

Over the years, I had investigated the cost of house moving operations, and found that most such deals were out of my price range. I had already started thinking up schemes for how to take a house apart piece-by-piece, mark the pieces for reassembly, and rebuilding it.

All along the way, I decided that since I'm a relatively young guy with lots of energy, I would do as much work as possible by myself, only calling in the experts if necessary for such things as buidling a roof or plumbing or something I would likely screw up.

The fact that the building is a log cabin, of course, makes it even more appealing as a disassembly job. Once the roof is off - at least on the log half of the building - the logs can be taken apart by simply lifting them off of each other.

Driving back to Austin later that weekend, I called my brother to tell him about the project. He knew I had been thinking about something like this and when I told him I had bought the house, he was excited. He had seen it too, and liked the idea. "Cool," was his one-word response.

Later, as we would begin the arduous task of taking down the roof, I turned to my brother. "I think I misheard you that night," I told him. "I thought you said, 'Cool' but now I'm convinced that you meant to say, 'Fool.'"

Joking aside, I've embraced the project and will see it through to the end. The house will be disassembled and moved about 8 miles from its current location, to my family farm. There, when rebuilt - with a foundation and some improvements - it will become a living testament to the history of our pioneer forefathers.

Thursday, January 14, 2010

Part I - The first step: Removing the Tin roof

October, 2008

The first step in tearing down the old cabin is to remove the old tin roof. Tin roofed houses are a Texas mainstay, but such roofs were not really affordable for ordinary people until the 1890s or so. Most old houses, therefore, were retrofitted with tin roofs.

Rather than go through the time and effort of tearing off the old wooden shingles that houses had used since Medival times, homeowners instead just put up the tin on top of the old shingles for an extra layer of protection from the elements.


For reasons which will become apparent later, I estimate the date of the tin roof on this house to be around 1910 or later. As you can see in the photo above, the roof - which once was silver-colored and tight-fitting - has fared poorly over the ages. But it has done its purpose - to keep the rain out - and if it had not been well-built when it was put on, the building would be in much worse shape today than it is.

In tearing down an old building - which you must do in this case to move it - the key is to disassemble it in roughly the reverse order it was put together. Although I was able to take off a few side boards on the structure, in general, I could do little until the roof was off. So that is step one.

In this phase I was assisted - as I will be for much of this project - by my brother Ray, who has infinitely more construction and destruction experience than I do. Here he is starting to take off the tin on the back side (the section previously uncovered was done so by the wind over the years).


I climbed atop the house with one crowbar to pry at the top of the tin while Ray pried on the bottom from the ladder. The pitch of the roof is very steep on the back, and less so on the front. Even so, it was very tricky to move around. The tin gave you nothing to grab onto if you should slip. Until you got to the peak of the roof, which you could either hold onto with one hand, or straddle like a horse. The latter, while not entirely comfortable, gave me the best stability.


Yee Haw!


Stacking the tin neetly to the side. It's too old and full of small holes to re-use on my new roof. Not sure what I'll use it for, but even rusted tin may one day have a use.

Once I got some of the tin off, it exposed the wood shingles beneath, which was a much better surface to work on. My combat boots - the same ones I wore in Iraq - gripped the wood well, and instead of slipping and sliding, I had a relatively stable platform from which to work. I still wasn't sure how much of the roof to trust. Beneath the shingles were some 1-inch thick cypress boards nailed to the rafters. I tried to spread out my surface area over the largest spaces possible, which both reduced slippage and made it less likely I'd fall through the roof.

Finally, the tin is off! I stand atop the stump of an old hackberry tree that was growing on the edge of the building. (Birds eat hackberry fruit, birds sit on edge of building, birds crap - hence the buidling was ringed with new hackberry trees).


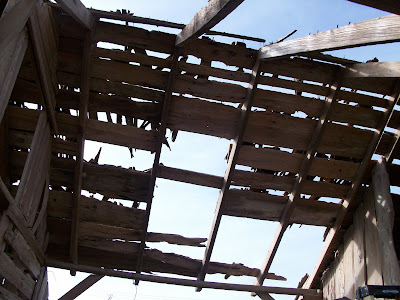
The back of the house, with the tin off.


The front. Looking at this with the tin gone, I was impressed by how much better it looked. The old wooden shingles give it a kind of ginger-bread house look. Still covered by dirt and debris, the image is not sharp, but the shingles give it a handsome appearance nonetheless. I decided right then and there that the new building will not have a new tin roof - as I had originally planned - but a shingle one. Although wood shingles are hard to come across and are highly flammable, they make synthetic ones that look virtually identical.

The debris that I found between the tin and the shingles. A mixture of old leaves from the trees which used to engulf this house, acorns left by squirrels and rat droppings. Mmm. Yum.


I've swept the top part with a broom, so you can see the difference between the clean shingles (a relative term because they're literally impregnated with dirt) and the ones still covered by debris.


For some reason, the old roof had two open spaces on either side (which had been blocked by the tin). I'm guessing this was nothing more than a primitive sky light.


The wooden shingles. Wood shingles - or shakes, as they're often called - were generally made out of cedar, as these are. Note how well worn these are - they were on the building for a very long time before the tin was added on top of them. You can see that the wear is uneven. The sections covered by the overlapping shingles above are often in perfect condition, but the portion exposed is reduced to about 2/3 of its original thickness due to erosion and little rivers and valleys are carved out of the wood by decades of rainfall.

Next step: Remove the shingles.

Wednesday, January 13, 2010

Part II - Removing the Shingles

October, 2008

As I began to survey the wooden shingles on the house, I noticed something very interesting: they were of two distinct types. Those on the left side of the house - that above the log cabin portion, were very flat and rectangular, and though well-worn, were in some cases salvagable:


Those on the right side of the building - the frame-and-board part, were much more rough-hewn and in abysmal shape:

Furthermore, whereas the former shingles were held down with modern round nails, the latter were held down with archaic square nails, which my research shows ceased production around 1910:


Square nails

This told me a lot about how the building was built, and I therefore pieced together this likely timeline (These are rough dates):

1. 1844-1850. The log portion of the building is constructed. Based on date of Castro Colony settlement and the fact that log cabins were generally the first things built.

2. 1850-1880. The wood-and-board section of the house was built as an add-on to the original log cabin. Based on the presence of recycled wood - including one board containing an advertisement - and the presence of square nails in the structural boards.

3. 1910-1930. The roof is replaced, but only on the log section. This is based on the presence of newer shingles using round nails in that section, but also the presence of bent-over square nails left in the boards below the newer shingles. What seems apparent is that whatever use the building had, the log cabin section was more valued than the board section, and received a new roof to protect it better.

4. 1930-1950. The tin roof is added on top of both sections of the house, as well as across the breezeway.

With that, I decided to remove the shingles. Although my goal is preservation of the building, and I want to generally save the oldest parts of it, the irony is that the old shingles on the board section are virtually impossible to salvage - nine out of ten would disintegrate as I attempted to take them off. However, the newer shingles fare slightly better. I was able to save (once I got my tactics down) one in four of those shingles.

Starting to take the shingles off the peak of the North (log) part of the cabin. Because the shingles are overlapping, you have to take them off in the reverse way of that in which they were put on. So I had to start on the top and move my way down.
Because the backside of the house is very steep, I generally pried the shingles up from the front side, reaching over the back of the building.


The shingles coming off. Very, very slowly.
I then tried from another angle. Moving the ladder along the side, I worked the shingles on the edge of the house all the way down. With that accomplished, I could climb up the steep side of the house using the spaces between the roof boards for footholds, hand holds - and in some cases - a lanyard by which I lashed myself to the building to prevent a fall.
This allowed me to move much faster. Still, it took two whole days to get the shingles off the back side. I passed the time by listening to a book on tape about the American Revolution from my truck stereo below.
The next weekend, I was back out to work on the project and this time came up with a better way to get the shingles off. Before, I had been using a pry-bar or crowbar. Now, I procured a flat shovel from the farm. This, I later found out, is the recommended way to remove shingles, and it was much faster, while still allowing me to save a good number of the shingles.

Part cowboy, part frogman. The googles are necessary due to the immense amount of dirt wedged between the shingles, which blows into your face as you pull them off.


Getting under them with the shovel, I can take up to 2 or 3 rows at a time off, letting them fall to the ground.
So much for the log half of the building. For the board half, I detailed brother Ray to take on that part. Ray is not as patient or devoted to historical preservation as I. His instinct is to just destroy. So I gave him the half of the building with shingles which couldn't be salvaged anyway.
Using a flat hoe and then a two-by-four, he simply bashed the shingles off from the bottom up - a much faster, but more destructive manner of removing the roof. His way also took out the roof boards as well, whereas I was leaving them behind.

Ray knocking out shingles from inside the house.

Shingles fly as Ray hits them from beneath.


More shingles flying.

It looks like a mess, but all these shingles are loose and can just be swept off the roof.

The lean-to-section on the South side is entirely roofless.
Next comes the breezeway...

Finally, the roof is entirely off of the board section of the house. I'm leaving the boards atop the log section because that part will be the last to be torn down:

The peak was framed with rough-hewn cypress slats:

The shingles which can be salvaged are then grouped into piles:


Having removed the shingles, I transported all of the wood to the barn on our farm, where it will be stored until the house will be rebuilt. I separated the shingles into one large pile of shards and a neat stack of usable shingles. My thought was to somehow incorporate them into the design of the new building, though not on the top as they would have been used.
However, after returning to Austin, I got a phone call. A contractor restoring an old house nearby was looking for a bunch of wooden shingles. He planned to put them on the inside of a building's roof, where they would only be visible from the bottom. He offered to buy my shingles. We negotiated a price - which was more than I had hoped for, and he came and got them. The money isn't a lot, but it will help buy additional wood or supplies for the project. And I'll need a lot of that.