
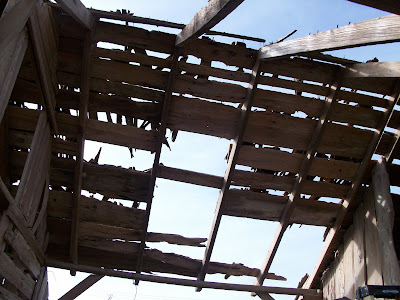
As I began to survey the wooden shingles on the house, I noticed something very interesting: they were of two distinct types. Those on the left side of the house - that above the log cabin portion, were very flat and rectangular, and though well-worn, were in some cases salvagable:

Those on the right side of the building - the frame-and-board part, were much more rough-hewn and in abysmal shape:

Furthermore, whereas the former shingles were held down with modern round nails, the latter were held down with archaic square nails, which my research shows ceased production around 1910:

Square nails
This told me a lot about how the building was built, and I therefore pieced together this likely timeline (These are rough dates):
1. 1844-1850. The log portion of the building is constructed. Based on date of Castro Colony settlement and the fact that log cabins were generally the first things built.
2. 1850-1880. The wood-and-board section of the house was built as an add-on to the original log cabin. Based on the presence of recycled wood - including one board containing an advertisement - and the presence of square nails in the structural boards.
3. 1910-1930. The roof is replaced, but only on the log section. This is based on the presence of newer shingles using round nails in that section, but also the presence of bent-over square nails left in the boards below the newer shingles. What seems apparent is that whatever use the building had, the log cabin section was more valued than the board section, and received a new roof to protect it better.
4. 1930-1950. The tin roof is added on top of both sections of the house, as well as across the breezeway.
With that, I decided to remove the shingles. Although my goal is preservation of the building, and I want to generally save the oldest parts of it, the irony is that the old shingles on the board section are virtually impossible to salvage - nine out of ten would disintegrate as I attempted to take them off. However, the newer shingles fare slightly better. I was able to save (once I got my tactics down) one in four of those shingles.
 Starting to take the shingles off the peak of the North (log) part of the cabin. Because the shingles are overlapping, you have to take them off in the reverse way of that in which they were put on. So I had to start on the top and move my way down.
 Because the backside of the house is very steep, I generally pried the shingles up from the front side, reaching over the back of the building.
The shingles coming off. Very, very slowly.
 I then tried from another angle. Moving the ladder along the side, I worked the shingles on the edge of the house all the way down. With that accomplished, I could climb up the steep side of the house using the spaces between the roof boards for footholds, hand holds - and in some cases - a lanyard by which I lashed myself to the building to prevent a fall.
This allowed me to move much faster. Still, it took two whole days to get the shingles off the back side. I passed the time by listening to a book on tape about the American Revolution from my truck stereo below.
The next weekend, I was back out to work on the project and this time came up with a better way to get the shingles off. Before, I had been using a pry-bar or crowbar. Now, I procured a flat shovel from the farm. This, I later found out, is the recommended way to remove shingles, and it was much faster, while still allowing me to save a good number of the shingles.
 Part cowboy, part frogman. The googles are necessary due to the immense amount of dirt wedged between the shingles, which blows into your face as you pull them off.
 Getting under them with the shovel, I can take up to 2 or 3 rows at a time off, letting them fall to the ground.
 So much for the log half of the building. For the board half, I detailed brother Ray to take on that part. Ray is not as patient or devoted to historical preservation as I. His instinct is to just destroy. So I gave him the half of the building with shingles which couldn't be salvaged anyway.
Using a flat hoe and then a two-by-four, he simply bashed the shingles off from the bottom up - a much faster, but more destructive manner of removing the roof. His way also took out the roof boards as well, whereas I was leaving them behind.

Ray knocking out shingles from inside the house.
 Shingles fly as Ray hits them from beneath.
 More shingles flying.
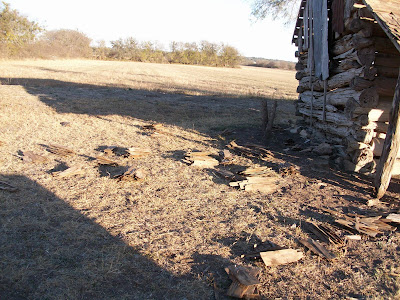
 It looks like a mess, but all these shingles are loose and can just be swept off the roof.
 The lean-to-section on the South side is entirely roofless.
Next comes the breezeway...
Finally, the roof is entirely off of the board section of the house. I'm leaving the boards atop the log section because that part will be the last to be torn down:
 The peak was framed with rough-hewn cypress slats:
 The shingles which can be salvaged are then grouped into piles:
Having removed the shingles, I transported all of the wood to the barn on our farm, where it will be stored until the house will be rebuilt. I separated the shingles into one large pile of shards and a neat stack of usable shingles. My thought was to somehow incorporate them into the design of the new building, though not on the top as they would have been used.
However, after returning to Austin, I got a phone call. A contractor restoring an old house nearby was looking for a bunch of wooden shingles. He planned to put them on the inside of a building's roof, where they would only be visible from the bottom. He offered to buy my shingles. We negotiated a price - which was more than I had hoped for, and he came and got them. The money isn't a lot, but it will help buy additional wood or supplies for the project. And I'll need a lot of that.
No comments:
Post a Comment